
Cabinets are an essential part of any home or office, providing storage and organization to keep everything in its place.
If you need a new set of cabinets or are looking to replace an old one, there are many options available, from traditional woodworking tools to modern technologies like 3D printing.
While traditional woodworking can be a rewarding and satisfying process, 3D printing offers unique advantages that may be worth exploring.
This guide will explore what a 3D printer is, how it works, some popular 3D printers, and how to use 3D printing to build your own cabinets.
What is a 3D printer and how does it work?
A 3D printer is a machine that builds objects from digital designs by adding layer upon layer of material until the final product is complete.
3D printing, also known as additive manufacturing, is a versatile technology that can be used to make a wide variety of objects from small toys to large buildings.
3D printing is a popular and rapidly growing industry, with new advancements being made every day.
There are several different types of 3D printers, but they all operate on the same basic principle.
The printer reads the digital design file and uses it to create a physical object by depositing material layer by layer. This material can be anything from plastic to metal to wood, depending on the type of printer being used.
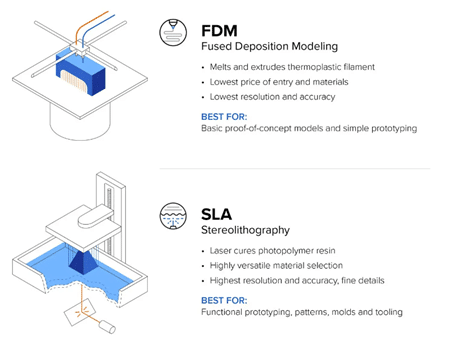
One common type of 3D printing is called fused deposition modeling (FDM), which is often used for hobbyist projects and small-scale manufacturing. FDM printers work by melting a plastic filament and depositing it layer by layer to build up the final object.
Another type of 3D printing is stereolithography (SLA), which uses a liquid resin that is cured by a laser to create the final object. SLA printers are often used in high-precision manufacturing applications, such as the production of dental prosthetics and jewelry.
There are also many other types of 3D printers, each with their own unique strengths and weaknesses. The choice of printer will depend on the specific needs of the project and the budget available.
Examples of popular 3D printers
There are many 3D printers available on the market, ranging from small hobbyist machines to large industrial models. Some popular examples of 3D printers include:
Creality Ender 3
This is a popular FDM printer that is often used for hobbyist projects. It is relatively affordable and offers good print quality for the price. It is also listed as the #1 best 3D printer under $500 on the market today.
Prusa i3 MK3
This is another popular FDM printer that is known for its reliability and ease of use. It offers a high level of customization, which makes it popular among advanced users.
Formlabs Form 3
This is a high-end SLA printer that is often used in professional manufacturing applications. It offers extremely high levels of precision and detail, making it a popular choice for creating small, intricate objects.
Ultimaker S5
This is a large-format FDM printer that is often used for large-scale manufacturing applications. It offers a high level of accuracy and precision, making it a popular choice for creating large, complex objects.
Modix BIG-Meter
While not a well known or popular brand, this FDM printer has a print area large enough to be able to create much larger pieces than those mentioned above.
This printer can create products as large as 40 inches in all directions: length, width, and height).
If you are looking to be able to print a full cabinet, and not just small pieces or custom hardware, this is the printer for you.
Using 3D printing to build cabinets
Now that we have a basic understanding of what 3D printing is and how it works, let’s explore how it can be used to build cabinets.
While 3D printing may not be the most efficient way to build large cabinets, depending on your printer size, it can also be useful for creating small components, custom parts, or unique features that are difficult to find or fabricate using traditional woodworking tools.
One example of this might be creating custom drawer handles or knobs. By designing and 3D printing these components, you can create a unique look for your cabinets that is not possible with off-the-shelf hardware.
You could also use 3D printing to create small brackets or other mounting hardware that are tailored to your specific needs.
Another way that 3D printing can be useful in cabinet building is by creating detailed prototypes or models.
By designing and 3D printing a small-scale model of your cabinet, you can test out different configurations and make sure that everything fits together. With this method, you can perfectly tailor to your needs and specifications, from the size and shape to the materials and finishes.
To get started with 3D printing your own cabinets, you will need to follow these steps:
Step 1: Design your cabinet
The first step in building a cabinet with 3D printing is to design it. T
his can be done using specialized software like SketchUp, Tinkercad, or Fusion 360. You can also find pre-made cabinet designs on websites like Thingiverse or MyMiniFactory.
When designing your cabinet, be sure to take into account the size and shape of your printer’s build volume. You may need to design your cabinet in sections that can be assembled later, or use a larger printer to accommodate the entire cabinet.
Step 2: Choose your materials
3D printing materials come in a wide variety of types and colors, so be sure to choose the right one for your project.
Common materials for cabinet construction include Polylactic acid (PLA), Acrylonitrile butadiene styrene (ABS), Polyethylene terephthalate glycol (PETG), and nylon.
You may also want to consider using composite materials, such as carbon fiber or metal-infused filaments, for added strength and durability.
Step 3: Set your printer parameters
Before printing your cabinet, you will need to set the parameters for your printer, including the layer height, infill density, and print speed.
These settings will vary depending on the type of material you are using and the complexity of your design.
If you are starting out with a new printer, you may have to do some test prints to dial in the correct settings for your needs.
Step 4: Print your cabinet
Once you have your design and materials ready, it’s time to print your cabinet. This process can take anywhere from a few hours to several days, depending on the size and complexity of your design.
Be sure to monitor your printer during the printing process to ensure everything is running smoothly.
Step 5: Assemble your cabinet
Once your cabinet is printed, you will need to assemble it.
This may involve using screws, glue, or other fasteners to hold the pieces together.
Depending on the complexity of your design, you may also need to add hinges, shelves, or other components to complete the cabinet.
Last words
3D printing is a versatile and exciting technology that can be used to build a wide range of objects, including cabinets.
With the right tools and knowledge, you can design and print your own custom cabinets that perfectly fit your needs and specifications.
Whether you are a DIY enthusiast or a professional designer, 3D printing is a great way to take your cabinetmaking to the next level.